Categories
DOORS 9

DOORS Baselines and Baseline Sets

What is a Baseline

When working in DOORS a record of all changes made is kept within the module and the object’s bar is yellow (indicating a change since the last baseline). To look at change history, a user can right click on the object and select “Properties” and then the “History” tab.

At any point in a project a baseline can be taken (see below for guidelines). This creates a read-only version of the module that captures the state of the module and its history at the point in time.  All history is removed from the live module and the object bar for each object is changed to blue.

The baseline can be accessed from the live module (“File” > “Baseline” > “View”). This opens the frozen copy of the module that includes the history that was contained within the module at the time of baselining.

Any new change history is recorded within the live module.

Difference between a Baseline and a Baseline Set

A Baseline Set is a baseline taken across multiple modules at the same point in time. When a project contains information in multiple linked modules baselines should always be taken using a baseline set. This then enables the related data to be viewed at the time the baseline set was created.

Baseline Set “Issues”

If a baseline set is created but does not include all of the modules within the baseline set definition duplicate links will be created from the module not baselined to both the baselined AND live versions of the modules within the baseline set.
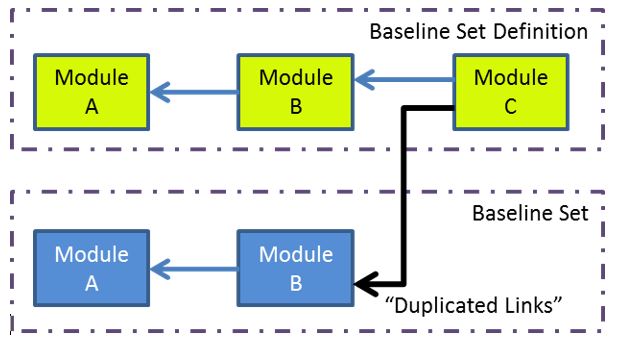
When a new baseline set is taken using the Baseline Set Definition that includes all of the modules, the “Duplicate Links” will disappear.

For more information:

https://www.ibm.com/support/knowledgecenter/SSYQBZ_9.6.1/com.ibm.doors.administering.doc/topics/c_baselinesetsphaseddev.html

When should Baselines Be Created

There are many views on how often baselines should be created. The more baselines taken, the more streamlined the module and the more data points within the project at which the state of the data can be traced back to. The downside is that it becomes more difficult to locate individual changes as the number of baselines that need to be examined increases.

The guidelines for creating baselines within Aircraft Support are:

Baselines should be create at the entry to major reviews (SRR / PDR / CDR)

Baselines should be created immediately prior to the generation of documents from the DOORS data, when the document will be distributed outside of the Systems Engineering team.

Create Baseline Set

This section provides step by step instructions of the creation of a baseline set definition and the use of this definition to create a baseline set.

Create Baseline Set Definition

IF A SUITABLE BASELINE SET DEFINITION EXISTS YOU DO NOT NEED TO PERFORM THESE STEPS

Select Folder or Project that contains all of the Modules that are to be included within the baseline set.,

 right click – Properties,

Baseline set definitions, New

Enter Name (BS Name) and Description (BS Description)

Edit…

Select Formal Modules to be included and “Add”

Add all required Modules

Select OK – This will take you to a list of the selected modules

Select OK (again)

You will now be back on the Properties window for the Project or Folder. The baseline set definition that has just been created will be displayed.

Create new Baseline Set

These are the instructions to be followed once a Baseline Set Definition has been created.

Select Folder or Project, right click – Properties

Select “Baseline Set Definitions”

Select the baseline set definition that is to be used

Select “Create Set…”

Decide if this is a “Major” or “Minor” version:

Major should be selected for the main review / issue points e.g issuing of documents or project reviews. If following a major baseline a change is required and the document / data is modified and the data is to be re-baselined, this should be a Minor.

Populate Suffix: This will be displayed after the baseline number and be the main method for identifying and selecting the baseline, is should be short e.g. “CDR”.

Populate Description: The description should provide details of when and why the baseline has been created.

Select the “Baselines” tab: This will list the modules identified within the Baseline Set Definition.

Select “Add to Set…” This will enable the modules within the definition to be selected for inclusion within this baseline set.

Select “Select All” –  If another user has any of the modules to be baselined open for edit,  a warning will be provided identifying which module can’t be added. Find which user has the module open and ask them to close it.

Select “Ok” – This will baseline all of the modules selected and the baseline definition windows can be closed.

Categories
Rational Quality Manager

Broken Back Links to DOORS and DNG

When linking to requirements, the links are not always formed correctly. In these cases the link is visible from RQM but not from DOORS or DNG.

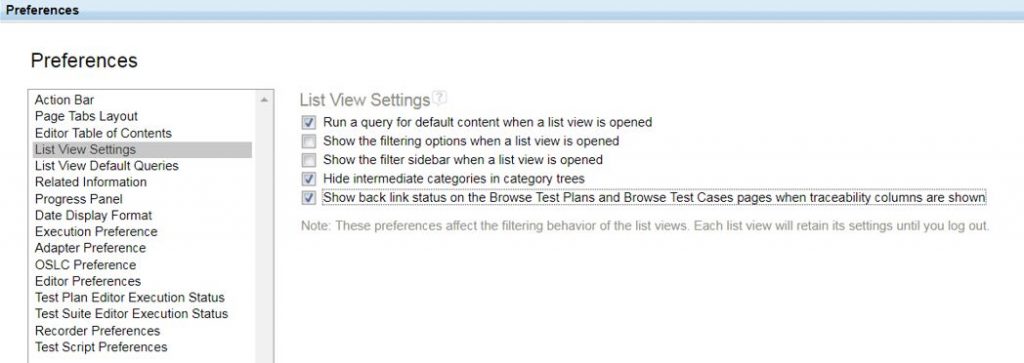
To address this first enable Back Link Checks via the preferences window:

Then

Ensure the bottom option is selected.

You can now return to a traceability view within RQM (for example browse Test Cases, if you now add the “Validates Requirements” column to the view, the Back Links check will be performed and a broken link symbol displayed when an issue is found. Note this can take some time to actually display.

Using the action menu on the broken link symbol enables the link to be repaired.

Categories
DOORS Next Generation

Importing CSV Data

This post looks at the simple task of importing data into DNG. This is a fairly easy task but there are a number of points to be aware of.

Prepare the .csv file (Can be a spreadsheet!!)

Data is imported from a .csv file. Column titles must match the attribute names, but there are also special columns / names to be used:

  1. Identifier – integer that identifies the objects and should put them in order. THIS MUST BE POPULATED. If you do not have valid values populate with incrementing integers starting at 1. DNG will re-number the artifacts as they are created/
  2. parentBinding <optional> – use the identifier of the parent artifact, should then put in the structure (within a module)
  3. isHeading <optional> – true or blank
  4. Name – name that will identify the artifact. Within DNG artifacts are named as well as having an identifier. Names can be populated at a later date. When exporting from DOORS 9.x to DNG, if the data does not have a field that is appropriate I have been using the Object Number.
  5. Primary Text <optional> – The main textual field for the artefact. When transferring data from DOORS 9  this is the contents of Object Heading and Object Text
  6. Artifact Type – Identifies the type of artifact to be created to represent this row of data. The Artifact Type must exist within DNG.
  7. Other Attributes <optional> – If you have other attribute data to be imported ensure the column heading matches the attribute name.

Where a multi select enumeration is to be imported the values must appear as a comma separated list in the cell: Val A, Val B, Val C

Perform the Import

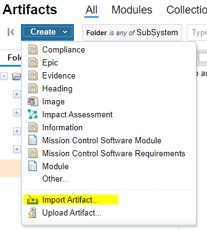
From the artifacts page, select:

This will then open a form with a number of options. Select “Import requirements from a CSV file”

Select the CSV file

Select “Import Requirements into a module” and select the module. This also enables the creation of a module in the required folder.

On the import form, when “Finish” is selected, the CSV file will be submitted for processing. The results will be displayed at the top of the page. Note it can take some time for the data to be imported.

Categories
Rational Publishing Engine

Extracting RQM linked requirements from DOORS 9.x

When generating a report on RQM data using RPE you may want to include linked requirements. If the requirements are held in DNG then this is a relatively easy process. The complication is when the linked requirements are held in DOORS 9.x. In this situation the requirement data is extracted from DOORS Web Access (DWA).

The DWA requirement schema is not provided as part of RPE and is not discoverable. It must be loaded from a .xsd file. A sample DWA schema (which was downloaded from RPE Actual) is provided below.

This file should be saved locally and then when adding a data schema within RPE, the main.xsd selected as the schema file.

RQM will provide a requirement URI of the form:

https://[server]:[port]/dwa/rm/urn:rational::1-55bb46603d9c55be-0-10009-000bf60

Which can be used to dynamically configure the DWA data source.

Unfortunately, this only works for DWA requirements that are not linked to RQM!

When a requirement has an RQM link, it has a different schema. Within the above schema the main.xsd file must be modified with the following:

<xs:element name="RDF"> 
    <xs:complexType> 
      <xs:sequence> 
<xs:element name="Statement"> 
<xs:complexType> 
<xs:sequence> 
<xs:element name="subject"> 
<xs:complexType> 
<xs:sequence> 
<xs:element ref="oslc_rm:Requirement"/> 
</xs:sequence> 
</xs:complexType> 
</xs:element> 
</xs:sequence> 
</xs:complexType> 
</xs:element> 
<xs:element ref="oslc_rm:Requirement"/> 
      </xs:sequence> 
    </xs:complexType> 
  </xs:element>

Using the modified schema will then allow the requirement data to be extracted.

Categories
DOORS 9

Load In Link Source Modules with DXL

In DXL, when looking at an objects links, only out links will return a valid object unless the source module is open. This function takes an object and the full name of a link module. It iterates through the in links that use this link module and ensure that the source module is open.

//------------------------------------------------
//  loadInLinkSourceModules()
//------------------------------------------------
/*
 * Ensure the source modules for all in-links (through 
 * the specified link name) are loaded
 */
void loadInLinkSourceModules(Object o, string strLinkName) {
	ModName_        modNameSource		= null
	ModuleVersion	ModVerSource		= null
	Object		oSource			= null
	Link		l
	LinkRef		lr
	string		strLinkModName		= ""

	for lr in all (o <- strLinkName) do {
		modNameSource = module( sourceVersion lr)
		if (!null modNameSource) {
			if ((!isDeleted modNameSource) && (null data(sourceVersion lr))) {
				load((sourceVersion lr), false)
			}
		}
	}
} // loadInLinkSourceModules()